How To Build Sprung Dance Floors
Do you have an area in your basement or even your business that you are considering designating for a dance floor, workout space, or indoor sporting use? Or you may have an existing spot that needs updating. Foam N’ More specializes in foam squares and cubes that are the perfect material for all high-impact activities, gym flooring, and dance floor needs.
A floating floor is one that is not nailed or glued to the subfloor. A sprung floor is a type of floating floor that absorbs shocks, which gives it a softer feel. These floors are considered the best kind for dance and indoor sports because they enhance performance and reduce the chance of physical injury. Modern sprung floors use foam backing or pads to provide support and give the floor spring.
Foam N’ More provides the foam for the basic construction of sprung floors. The foam is a closed-cell foam with fine, uniform cells called Minicell. We offer the foam in either 3” x 3” x ¾” squares or 3” x 3” x 3” cubes. Determining which to use will depend on how you plan to use the sprung floor. Some key factors to consider are the amount of impact to be absorbed by the floor, how much distance the floor will deform under the impact, and rebound on the surface of the sprung floor compared to a concrete surface. The 3” x 3” x 3” cubes are typically better for high-impact activities or gym flooring.
The foam pieces are offered either with or without adhesive backing. If you choose to not have the adhesive backing, then you will have to apply glue to the foam and the wood yourself. The adhesive backing is convenient and makes the foam easier to apply with less mess than applying glue yourself. The adhesive is strong and suitable for wood, rubber, cement, plastic, and other surfaces.
To determine how many foam pieces you need for your sprung floor, we suggest at least 3 different layouts for the foam. All formats are based on a standard 4ft x 8ft underlayment grade plywood sheet. The plywood sheets need to be either 5/8” thick or 3/4” thick. The existing floor you are putting the sprung floor on top of needs to have fully adhered and well bonded must be level with cuts, gauges, and other irregularities repaired or replaced, must not be embossed or textured enough that it will telegraph through the sprung floor, and needs to be clean, smooth and dry. If you are using concrete flooring as the subfloor, we recommend applying a vapor/moisture barrier before laying down the sprung floor.
Sprung Floor – option #1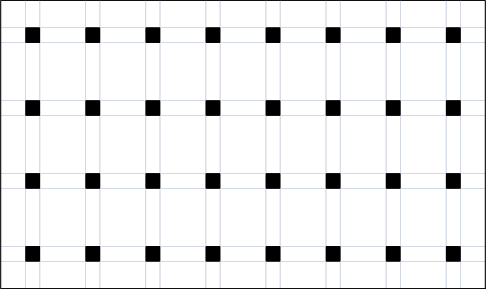
You will need plywood sheets, foam pieces, and deck screws with the thread running all the way up to the head. This layout requires 32 foam pieces per 4ft x 8ft plywood sheet (32 sq ft). For the total pieces needed, follow the formula below: Number of sq ft needed _____ divided by 32 = _____ x 32 = _____ number of foam pieces needed
Space the foam roughly every 12”, with the foam 6" from the edge of the plywood. Place the plywood foam down on the subfloor. Put the second layer of plywood on top of the first layer and run this top layer perpendicular to the bottom layer so that the seams are staggered. Use the deck screws to secure the plywood pieces together and add the performance surface on top of the second plywood layer. See the diagram below for placement of the foam on the plywood:
*Note that you can also stagger the foam pieces in this grid layout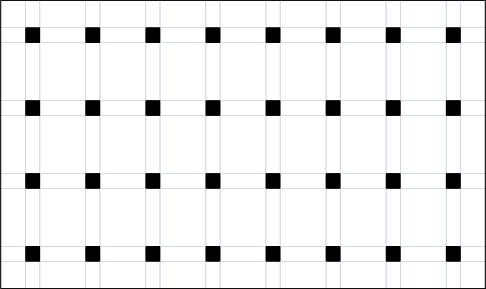
Sprung Floor – option #2
This second option is very similar to the first option however it requires fewer plywood sheets. You will need 4” wide x 3/4” thick wood planks cut to various lengths, plywood sheets, nails/deck screws, and foam pieces. This layout requires 32 foam pieces per 4ft x 8ft plywood sheet (32 sq ft). For the total pieces needed, follow the formula below: Number of sq ft needed _____ divided by 32 = _____ x 32 = _____ number of foam pieces needed Lay down 4" wide wooden planks in a grid format and apply the foam pads onto the wood planks, making sure to place them every 12" on the planks. Flip the planks over, space them out appropriately, and place the plywood sheets on top of the planks. Use nails/deck screws to secure the wood planks and plywood together. Add the performance surface on top of the plywood layer. See the following video: https://www.youtube.com/watch?v=HY6c3lJXMPk
Sprung Floor – option #3
You will need plywood sheets, foam pieces, and deck screws with the thread running all the way up to the head. The second layout requires 54 foam pieces per 4ft x 8ft plywood sheet (32 sq ft) which is 6 rows and 9 columns. For the total pieces needed, follow the formula below: Number of sq ft needed _____ divided by 32 = _____ x 54 = _____ number of foam pieces needed

Place the foam about 8" around the perimeter of the plywood and then in a grid in the center, about 12-16" apart. Then place the plywood, foam down on the subfloor. Put the second layer of plywood on top of the first layer. Run this top layer perpendicular to the bottom layer, so that the seams are staggered. Use the deck screws to secure the plywood pieces together. Add the performance surface on top of the second plywood layer.
See the diagram below: Note that all of the methods suggested have the foam glued to wood, not to the subfloor.
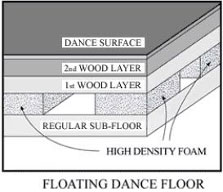
The correct placement of each layer of material is shown in the image below: Foam N’ More: Foam Fabricators and Sprung Dance Floors in Michigan Minicell foam blocks are custom foam inserts for the best bounce on a dance floor.
Call Foam N’ More, the foam fabricator specialists today at (248) 284-0002 for any questions you may have about floor foam and floor padding, outdoor foam, pillow foam, patio cushion replacement foam, or any type of minicell or polyethylene foam near Troy, Michigan.

